.png)
Customize Pivot Tables Using Custom Slicers
by Simon Calder

 Creating a Custom Slicer Style
Create a custom slicer style and modify slicer settings so that the slicer meets branding guidelines or matches the spreadsheet style.
Custom Slicers
Slicers are visual filters. We can use them to filter data in a Chart, PivotTable, or Pivot Chart.
By default, slicers will display in a one-column layout with the header displayed. The color of the slicer is determined by the theme in use in Excel.
The default look and feel of slicers and timelines are not always appropriate for the spreadsheet we are working on. It might be that we have company-branded colors that we need to use. Or maybe we need to change the layout of the slicer, so it fits better onto the worksheet.
We can customize every aspect of our slicers and create our reusable custom slicer.
Inserting Slicers
Slicers can be inserted for any field in our data source. Timelines can only be inserted for date fields.
- Click on the Pivot Chart.
- From the PivotChart Analyze tab, in the Filter group, click Insert Slicer.
- Select the column/field to filter by.
- Click OK to insert the slicer.
Repeat these steps to insert multiple slicers.
Slicer Ribbon
Slicers have their contextual ribbon that contains all the commands needed to modify and manage the slicer. We will focus on the Slicer Styles group.
Slicer Styles
We can change the color of the slicer by selecting a Slicer Style from the gallery. The colors we see in the gallery are determined by the theme we have in use in Excel. Currently, we have the ‘Office’ theme selected.
To see a different color palette, we need to change the theme.
- From the Page Layout tab, in the Themes group, click Themes.
- Select Ion Boardroom.
- Click back on the Slicer. Note the different colors available for the slicer.
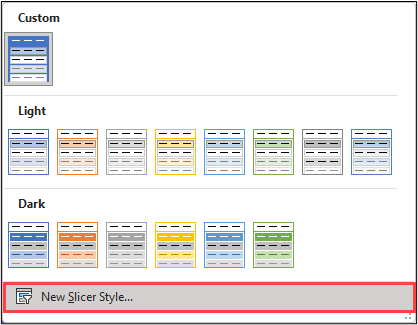
Modifying an Existing Slicer Style
To create our custom slicer style, we can modify an existing style or create a new style. If we decide we want to use most of the properties of an existing style but make some minor tweaks, it’s more efficient to modify the style. It’s worth noting that we cannot directly modify an in-built style, we need to duplicate it first.
- Right-click on any style in the gallery.
- Select Duplicate from the menu.

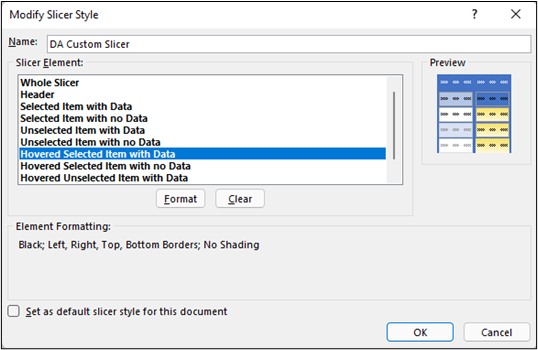
- In the Modify Slicer Style dialog box, give the slicer a name
- The Slicer Element area lists each part of the slicer that can be customized. For example, if we select Whole Slicer, any formatting changes we make will apply to the whole slicer. If we select Header, we will only be making formatting changes to the header.
- Select Whole Slicer.
- Click the Format button.
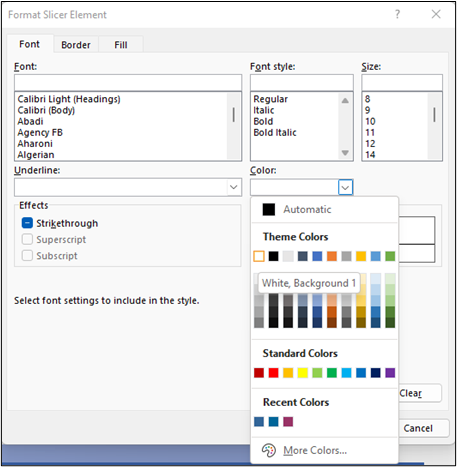
- Use the Font, Border, and Fill tabs to customize the overall look and feel of the slicer.
- We are going to change the Font to Arial, Italic, and the Font Color to Dark Blue.

We are also going to remove the border from the slicer.

And change the Fill Color to Dark Blue.

- Click OK.
- Click OK again.
- The new custom slicer is now available to select from the gallery in a new group called Custom.

Select the Custom Slicer to apply it.

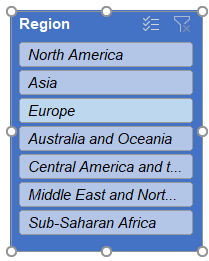
Now is the time to review the new slicer style and make any changes. Let’s change the header ‘Region’, to white, and bold, and change the hover-over color to light blue.
- Right-click on the custom style.
- Select Modify.
- Choose Header from the Slicer Element list.
Note the formatting currently applied to the header.
- Click the Format button.
- From the Font tab, change the Font Color to White, Background 1.
- Change the Font style to Bold.
- Click OK.
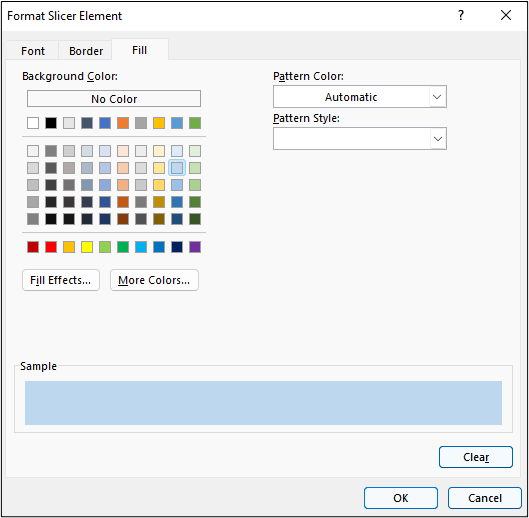
- Select Hovered Selected Item with Data from the list.
- Click the Format button.
- From the Fill tab, select light blue from the palette.
- Click OK.
- To set this style as the default for all new slicers, put a tick in the Set as default slicer style for this document checkbox.
- Click OK.
- Review the slicer and make further modifications if required.
Creating a New Slicer Style
Sometimes we might want to create a new slicer style that isn’t based on an existing style. We can create a new style from scratch.
- Click on a slicer.
- From the Slicer tab, in the Slicer Styles group, click the drop-down arrow.
- Click New Slicer Style.
The only real difference here is that we are starting from a blank, unformatted slicer. We change the formatting in the same way.

Slicer Settings
We can modify the slicer settings and control the layout and the information displayed on the slicer.
Layout
By default, slicers have a one-column layout. All items are listed in one column running vertically down the page. We can change this by modifying the columns.
- Select the slicer.
- From the Slicer tab, in the Buttons group, adjust the number of columns using the arrows.

We can use this technique to change our slicer from a vertical to horizontal slicer.

Display Header
To keep the slicer looking clean, we could choose to hide the header. This will hide the slicer name, the multi-select button, and the clear button from view.
- Click on the Slicer.
- From the Slicer tab, in the Slicer group, click Slicer Settings.
- Remove the check from Display Header.
- Click OK.

Resize the slicer by dragging the resize handles.

The slicer can now be positioned next to the chart.
The customizations ensure that the slicer looks like it is part of the chart and not a separate entity.

NOTE: If we choose not to display the header, the clear filter button is no longer accessible. We can still clear the filter, simply right-click on the slicer and choose Clear filter.

For additional information on this topic and more, check out our Pivot Table courses.
by Simon Calder
More Blogs by Simon Calder


Amortization Tables Explained
Amortization tables are commonly used in the financial sector. They li...
Multiple Dependent Data Validation Drop-down Lists
Data Validation drop-down lists are a powerful Excel feature. Cre...
Related Blogs

Why you don't need to know EVERYTHING about Microsoft...
When it comes to working with computer software in business today, Mic...

How can soft skills help you in life and at work?
What are soft skills? Soft skills are the personal qualities that h...
Ranking Data Explained
Ranking helps us see where a value lies in the context of other values. For...